Urban Dreamscape Film Burn Portrait is a cinematic portrait photography style that blends analog film burn textures with double exposure city skyline overlays directly onto a subject's face. This creates a hauntingly beautiful, vintage-meets-futuristic aesthetic that feels both emotionally raw and visually stunning — perfect for AI-generated editorial and creative portrait work.
Urban Dreamscape: Film Burn Portrait — The Cinematic Portrait Photography Trend Taking Over AI Art
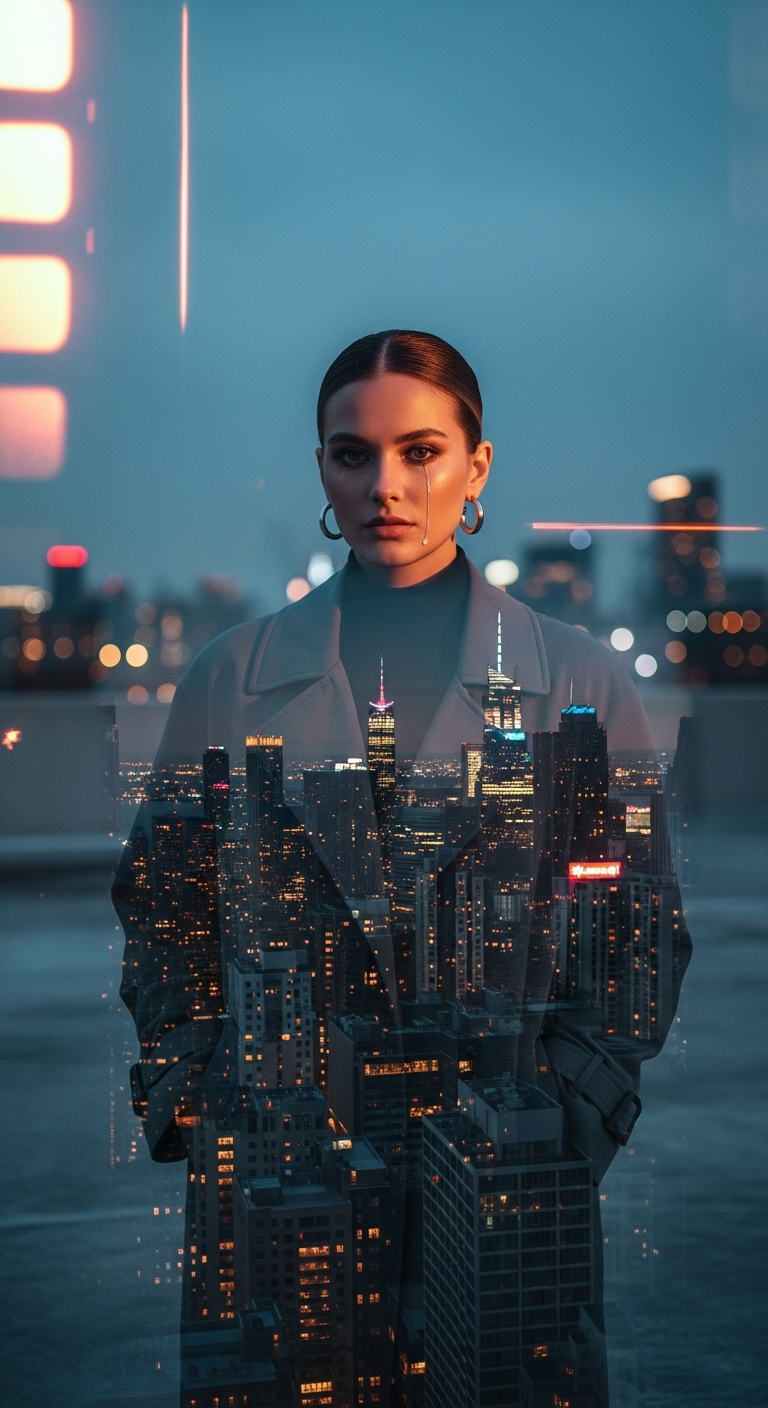
Imagine a portrait so layered with emotion and texture that you can't stop staring at it. A woman's face half-consumed by a glittering city skyline, warm film burn streaks bleeding across the edges, a single tear catching the last light of twilight. That's the Urban Dreamscape Film Burn Portrait — and right now, it's one of the most talked-about AI photo editing styles on the internet.
What Is the Urban Dreamscape Film Burn Portrait Style?
At its core, this style lives at the intersection of two beloved visual traditions: the raw, imperfect warmth of analog film photography and the dramatic grandeur of cinematic portraiture. The "film burn" refers to those gorgeous, warm orange and red streaks you'd see when actual photographic film was accidentally exposed to light — a happy accident that photographers have been recreating intentionally for decades.
The double exposure element takes that nostalgia even further. Double exposure is a darkroom technique where two separate images are layered onto a single frame. Here, the city skyline isn't just in the background — it's inside the subject, merging with her face to create a transparency effect that feels equal parts editorial fashion photography and surrealist art.
In cinematic portrait photography, every element tells a story. The rooftop setting, the twilight hour, the slicked-back hair, the oversized trench coat — these aren't random choices. They build a world. They suggest a character. And when you merge that character with a glittering metropolis, you're not just taking a portrait. You're creating a mythology.
The Viral Prompt
Prompt
A cinematic ultra-realistic portrait of a stylish young woman standing on a deserted concrete rooftop overlooking a sprawling metropolis during the twilight hour. The city lights below shimmer into a soft bokeh, and distant neon signs cast a faint ambient glow. She is wearing an oversized charcoal grey trench coat, a sleek black turtleneck, and minimalist silver hoop earrings. Her hair is slicked back into a low bun. She looks directly at the camera with a profound, confident gaze, her hands casually tucked into her coat pockets. Her face is subtly merged with an abstract, artistic double exposure of a vibrant, high-rise city skyline at night, creating a mesmerizing transparency effect. This overlay is further enhanced by subtle, warm analog film burn streaks across the top and sides of the frame, adding a vintage, dreamlike quality. A single, delicate tear rolls down her cheek, catching the light. Soft, diffused twilight light illuminates her face, creating dramatic shadows and highlights. Shallow depth of field, cinematic low-light ambience, subtle bokeh background, melancholic yet powerful mood, realistic skin texture, high detail, cinematic color grading, professional photography, DSLR quality, 85mm lens, ultra detailed, 8K
How to Use This Prompt Step by Step
Getting the most out of this cinematic portrait photography prompt is straightforward once you know what each layer is doing. Here's how to approach it:
Step 1 — Choose your AI platform. This prompt performs exceptionally well on Midjourney (v6 and above), Adobe Firefly, and Leonardo.ai. Midjourney tends to nail the film burn texture and the double exposure transparency most naturally. For the most photorealistic skin detail, Leonardo.ai with its PhotoReal mode is a strong contender.
Step 2 — Paste the full prompt as-is first. Before tweaking anything, run the original prompt verbatim. Get a baseline result. You'll immediately see which elements the AI is prioritizing — usually the double exposure and the film burn come through strongly, while the tear and precise clothing details may need reinforcement.
Step 3 — Adjust the double exposure intensity. If the city overlay feels too heavy and obscures the face too much, add a phrase like "subtle ghost-like city overlay, 30% transparency" to soften it. If it's too faint, try "bold double exposure merge, high contrast city silhouette overlay."
Step 4 — Dial in the color grading. This style lives and dies by its color palette. The sweet spot is warm amber film burn tones contrasting against cool teal and blue city lights. You can specify: "teal and orange cinematic color grade, warm shadow tones, cool highlights."
Step 5 — Refine with negative prompts. On platforms that support them, use negative prompts to exclude: "cartoon, illustration, painting, flat lighting, overexposed, blurry face, distorted features."
Tips to Get the Best Results
Anchor the mood with specific lighting language. "Soft diffused twilight light" is good, but "golden hour rim lighting with cool blue fill light from city glow below" is better. The more specific your lighting description, the more cinematic your result.
Don't skip the lens specification. The "85mm lens" detail in this prompt is doing real work. It simulates the natural compression and shallow depth of field that makes portrait photography look professional. Always include lens focal length in cinematic portrait photography prompts.
Layer your emotions intentionally. The tear is a masterstroke of this prompt — it introduces vulnerability into what would otherwise be a purely powerful image. Emotional contradictions (confident gaze + tear, melancholic mood + powerful stance) create visual tension that makes images unforgettable.
Use iterative upscaling. Generate at standard resolution first, then upscale your best result. Details like the film burn streaks, the bokeh shimmer, and the skin texture all become significantly richer at higher resolutions.
Experiment with the city. The prompt uses a generic metropolis, but swapping in a specific city adds character. Try "Tokyo skyline double exposure" or "New York City at night double exposure" for instantly recognizable cityscapes that add cultural context to your portrait.
Why This Style Is Trending
Cinematic portrait photography has always been popular, but the film burn double exposure variant is having a serious moment right now — and there are a few converging reasons why.
First, there's the nostalgia factor. After years of hyper-clean, highly processed digital aesthetics, audiences are craving imperfection. Film grain, light leaks, and analog textures feel human and authentic in a way that flawless digital imagery sometimes doesn't. The film burn effect is essentially a visual permission slip to feel something.
Second, the double exposure technique has found massive new life in AI art because it's genuinely difficult to execute well in traditional photography or manual compositing. AI can blend a cityscape into a face with uncanny, organic-looking results that would take a skilled editor hours to achieve in Photoshop.
Third, this style is deeply versatile for storytelling. The city-as-identity metaphor — a person whose very face is made of the city they love or belong to — resonates across cultures. It works for personal projects, editorial fashion, album artwork, book covers, and social media content alike.
Finally, the emotional complexity of the style drives engagement. That single tear, that direct gaze, that twilight light — they invite the viewer to ask questions. Who is she? What is she thinking? Why is she crying? Compelling cinematic portrait photography always leaves room for the viewer's imagination, and this prompt does exactly that.
What AI tools work best for cinematic portrait photography prompts like this?
Midjourney v6+ is the top choice for this style due to its exceptional handling of lighting, texture, and double exposure effects. Leonardo.ai with PhotoReal mode is excellent for ultra-realistic skin detail. Adobe Firefly works well for users who need commercially safe outputs. Stable Diffusion with the right checkpoints (like DreamShaper or Realistic Vision) also produces strong results with this prompt.
Can I use this prompt for commercial projects?
It depends on the platform. Midjourney's commercial use rights are tied to your subscription tier. Adobe Firefly is designed with commercial use in mind and is generally the safest option for professional projects. Always review the terms of service of whichever AI tool you're using before publishing or selling generated images commercially.
How do I make the double exposure effect more or less prominent?
Add descriptive intensity language to your prompt. For a stronger effect, use phrases like "bold double exposure, high contrast city overlay, dramatic transparency merge." For a subtler look, try "faint ghost double exposure, 20% city transparency, barely visible skyline overlay." Adjusting the balance between portrait and city elements is key to getting your desired result.
What does "film burn" mean in photography and AI art?
Film burn refers to the discoloration and streaking that occurs when photographic film is accidentally or intentionally exposed to direct light before or after shooting. It creates warm orange, red, and yellow streaks or halos around the edges of an image. In AI art, it's used as a stylistic element to add vintage warmth, imperfection, and a dreamy analog quality to otherwise digital images.
Can I change the subject in this prompt to a male portrait?
Absolutely. Simply swap "stylish young woman" for "stylish young man" or any other subject description. The rest of the prompt transfers beautifully — adjust the clothing details (perhaps a structured wool overcoat instead of a trench coat) and the accessories to fit your vision. The core cinematic portrait photography elements remain just as effective regardless of subject.
Why does the 85mm lens specification matter in AI prompts?
Specifying a lens focal length tells the AI to simulate the optical characteristics of that lens. An 85mm lens is the classic portrait photography choice because it produces natural-looking facial proportions, beautiful background compression, and a creamy shallow depth of field. Including it in your prompt consistently produces more professional, realistic-looking portrait results compared to leaving it unspecified.
How can I add my own city to this prompt?
Replace "a sprawling metropolis" and "vibrant, high-rise city skyline" with your specific city. For example, "the Tokyo skyline with neon kanji signs" or "the Paris skyline with the Eiffel Tower glowing in the distance." This instantly adds cultural identity and specificity to the portrait, making it feel like the subject and their city are truly one and the same.
What aspect ratio should I use for cinematic portrait photography prompts?
For a cinematic feel, use a 2:3 ratio (portrait orientation) for editorial and fashion-forward looks, or a 16:9 widescreen ratio if you want to emphasize the cityscape and create a more theatrical, movie-poster composition. On Midjourney, append --ar 2:3 or --ar 16:9 to your prompt. The 2:3 ratio tends to work best for highlighting the double exposure face effect.
Now go generate your city — because somewhere between a rooftop, a film burn, and a twilight skyline, there's a portrait waiting to tell your story.